Mostrando entradas con la etiqueta Baking. Mostrar todas las entradas

martes, 24 de septiembre de 2013

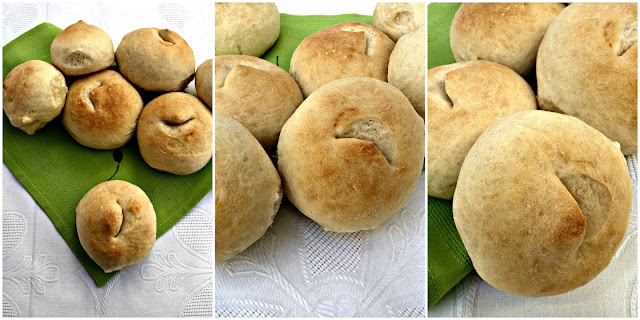
Panecillos de leche – Pan de Leche


red facilisimo thermomicocina ▼


Mañana comienza el año. Y es que para mi el año no empieza el 1 de enero, sino con la "vuelta al cole" y mañana ese momento llegó. Me parece que lo más apropiado para darle la bienvenida y desear buena suerte a todos (Alumnos, profesores y padres) qué mejor que comenzar con los panecillos que servirán para los bocatas de media mañana.

Una vez más de leche y de mi autor favorito, Xavier Barriga y su libro Pan.

Panecillos de leche

* Necesitamos:
- 500 gr de harina de media fuerza
- 12 gr de sal
- 40 gr de azúcar
- 25 gr de leche en polvo
- 20 gr de miel
- 1 huevo
- 250 gr de leche fresca
- 50 gr de mantequilla
- 25 gr de levadura fresca
- 1 huevo para pintar


Panecillos de leche

* Preparación:
1.- Tradicional:
- Partimos la mantequilla en trozos pequeños, la dejamos a temperatura ambiente durante 30 minutos.
- Ponemos todos los ingredientes de la masa excepto la leche y la levadura, en un cuenco, mezclamos bien y vamos añadiendo la leche poco a poco, a medida que la masa se va quedando seca.
- Al final añadimos la levadura, debe quedarnos una masa firme pero lisa y bonita.
- Cortamos porciones iguales de 80 gr y las dejamos reposar 30 minutos tapadas con un paño húmedo.
- Formamos barritas sin punta, las ponemos en la bandeja del horno, las pintamos de huevo ligeramente batido y mezclado con un poquito de sal.
- Damos unos cortes profundos con un cúter y las dejamos doblar su volumen en un lugar cálido en la cocina durante unas dos horas.
- Precalentamos el horno a 250º generando vapor.
- Cuando los panecillos hayan doblado su volumen, los pintamos otra vez con huevo y los horneamos a 230º durante unos 12 minutos.


Panecillos de leche

2.-  Thermomix:
- Ponemos en el vaso el azúcar, la leche en polvo, la miel, el huevo, la mantequilla a temperatura ambiente, la levadura y la leche fresca, mezclamos 30 seg., vel. 5
- Añadimos la harina y la sal, mezclamos 15 seg., vel. 5 y después amasamos 3 min., vaso cerrado, vel. espiga.
- Cortamos porciones iguales de 80 gr y las dejamos reposar 30 minutos tapadas con un paño húmedo.
- Formamos barritas sin punta, las ponemos en la bandeja del horno, las pintamos de huevo ligeramente batido y mezclado con un poquito de sal.
- Damos unos cortes profundos con un cúter y las dejamos doblar su volumen en un lugar cálido en la cocina durante unas dos horas.
- Precalentamos el horno a 250º generando vapor.
- Cuando los panecillos hayan doblado su volumen, los pintamos otra vez con huevo y los horneamos a 230º durante unos 12 minutos.


Fuente: http://www.olorahierbabuena.com/

URL: Olor a Hierba Buena

Ver el blog de thermomicocina


Etiquetas de UNYKA: , , ,
Leer más...

Panecillos de pan blanco con poolish de yogur

Via: red facilisimo - thermomicocina ▼


Con el comienzo del curso, los panecillos y las magdalenas comienzan a viajar. Es lo que nos toca durante los próximos meses. Estos en concreto han gustado muchísimo, para tener en cuenta.


Corteza dorada pero a la vez suave, blandita, la miga esponjosa a más no poder.

Además al no llevar nada de mantequilla mucho más sanos pero no por ello aguantan menos.

¡Una vez más de mi adorado Xavier Barriga!

Panecillos de pan blanco con poolish de yogur

* Necesitamos:
Para el poolish de yogur:
- 100 gr de harina de fuerza
- 100 gr de yogur natural
- 5 gr de levadura fresca
- 60 gr de agua


Para los panecillos:
- 500 gr de harina panificable
- 10 gr de sal
- 225 gr de agua
- 5 gr de levadura fresca
- 200 gr de poolish de yogur

Fuente: PAN de Xavier Barriga

Panecillos de pan blanco con poolish de yogur

* Preparación:
Del poolish:
- Mezclamos la levadura con el agua, hasta que esté bien disuelta.
- Añadimos el yogur y mezclamos.
- Agregamos la harina, mezclamos hasta que tengamos una mezcla cremosa y sin grumos.
- Tapamos el recipiente con un paño húmedo y lo dejamos fermentar durante 3 horas a temperatura ambiente o en el frigorífico hasta el día siguiente.


Panecillos de pan blanco con poolish de yogur

De los panecillos:

- Amasamos los ingredientes e incorporamos el poolish de yogur directamente de la nevera.

Agregamos la levadura al final del amasado.

- Dejamos reposar durante 15 minutos tapada.

- Cortamos piezas de unos 30 gr y formamos con ellas unas bolitas redondas y lisas.

- Las vamos colocando en una bandeja de horno, dejamos una separación entre ellas porque al fermentar aumentan de volumen.

- Tapamos las bolitas con un paño húmedo y las dejamos fermentar durante 90 minutos en el lugar más cálido de la cocina.

- Precalentamos el horno a 250º y ponemos en su interior una pequeña olla con paños mojados para generar vapor.

- Antes de hornear los panecillos, les hacemos un corte con las tijeras ligeramente inclinadas y los mojamos sin miedo con un pulverizador de agua, así quedarán blanditos por fuera.

Cocemos el pan durante unos 12 minutos o hasta que se adquieran un ligero y bonito color dorado.


Panecillos de pan blanco con poolish de yogur

Fuente: http://www.olorahierbabuena.com/

URL: http://www.olorahierbabuena.com/2013/09/panecillos-de-pan-blanco-con-poolish-de.html


Via: red facilisimo - thermomicocina ▼


Etiquetas de UNYKA: , ,

Leer más...

sábado, 12 de febrero de 2011

Valentine’s {Love} Cupcakes


Disco Dust.

I’m definitely a sucker for it.


I’d use it on almost every cookie if I could (but I try to restrain myself), but when I found these sparkly LOVE stickers at Michael’s Craft Store I knew I had to make a sugar version of them.


I ended up making simple royal icing decorations (also known as transfers, runouts or floodwork), instead of cookies, for these Valentine cupcakes.


If you’d like to try making these cupcakes and icing decorations, check out the how-tos below.


*

For the Valentine {Love} Cupcakes, you’ll need:


For the Royal Icing {Love} Toppers, you’ll need:

*

How to Make {Love} Sugar Decorations:

I used my KopyKake projector to project the Love stickers so I could trace the image, but if you’ve got drawing talent you won’t need the projector.    If you’d like to see a KopyKake projector tutorial, click here. These shapes are so simple that you really don’t need the KopyKake though; you could just trace them!  I projected them because I was able to change the size and make them bigger that way.

So, let’s begin!

  1. Cut the transparency (or parchment paper) out just larger than the size of the image you’re piping.  Lightly coat transparency, with a small amount of shortening using some paper towel.  This helps make the royal icing shape easier to remove when it’s dry.


2.  Pipe royal icing outline


3.  Flood or fill in your outline


4.  Gently shake the transparency left to right to help the icing smooth over.


5. Shake disco dust onto your wet icing


6.  Pick transparency up and pour excess disco dust back into container.  Some disco dust sticks to the shortening but you can probably do a better job than me if you’re not rushing.


7.  Make extras of your shapes as royal icing transfers can break easily, especially if they’re a delicate design.  These ones weren’t too breakable as they were a bit larger.  (I think I’d make them smaller next time though; they’re a bit too big for the cupcakes now that I see them on top).


8.  Let icing dry for at least 24 hours.


9.  Gently remove icing decoration by peeling the backing away


10.  Place on cupcakes, cakes, cookies etc.


It may look like it took a long time to make the “LOVE letters’ with all the pics, but they’re actually quite quick and easy to make.  Once I made and colored the royal icing, creating (doubles of) these took about 10 minutes.  Then it was just a matter of letting them dry for 24 hours and making the icing and cupcakes.

Here’s a slideshow of the whole icing decoration process if you’d prefer to see it that way:

How to Make a Royal Icing Decoration

*

(Click here if you can’t see the slideshow).

I made the pink ‘letter O’ reverse the original sticker as it was easier to make that way.  For a visual how-to view the slideshow below.

Royal Icing Valentine Heart How-To

*

(Click here if you can’t see the slideshow).

To see another post on how to put disco dust on cookies, click here or to see another post on making royal icing transfers, click here.


If you have any questions or comments, please drop me a line below and come join me on facebook here.

Enjoy making your ‘love letters‘! 


Via: Sweetopia


UNYKA Etiquetas de : , , , , , , ,
Leer más...

Valentines: How do you store {Royal Icing} and how long can you keep it?


Posted on January 30th, 2011 in Cupcakes, Tutorials


I had lots of leftover royal icing from my last Valentine’s cupcakes, so I decided to make some more royal icing decorations using these Martha Stewart Valentine stickers as my design.


As I was making these I recieved an email from Bianca, asking me how long I keep the royal icing in the piping bag and how long I keep it in storage.


She’s one of many who’ve asked, so I thought I’d share the info. here.


So how long can one keep royal icing?


Royal Icing:

Before I answer that question, a little about royal icing.

Royal icing is made using either raw egg-whites (traditional), or using dried egg whites or meringue powder.

Although I have not heard of any documented cases of food-borne illness occurring due to eating traditional royal icing (made with egg whites), there is still a possibility that bacteria such as salmonella can be present in anything made with raw eggs.  Although many would not be affected by the bacteria, the very young, elderly, pregnant women and those with weaker immune systems might be.

You could use pasteurized egg whites found in cartons at the grocery store, but I’ve found that the icing doesn’t whip up as nicely using them.


Safest and most effective for cookie decorating in my experience has been royal icing made with meringue powderI’ll be referring to royal icing made with meringue powder from here on in. All of the following information also applies to both tinted and white icing.

*

What is Meringue Powder?

*Meringue powder is a fine, white powder made with pasteurized dried egg whites, sugar and gum; used to replace fresh egg whites when making icings and meringues. (*The Prentice Hall Essentials Dictionary of Culinary Arts, Pearson Prentice Hall, 2008).  It usually includes vanilla flavouring and is not usually sold in grocery stores but can be found in bulk food stores, baking supply stores or on the internet.


So now that that’s covered:

*

How long can one keep royal icing?

Freshest is always best of course, but you can keep your icing for a week or even up to two.

The longer it sits though, the more time it has to separate.

The water and icing sugar separate; after about a week you’ll have to really mix it up again to use it, and it may be difficult to make sure it’s perfectly smooth.  -The liquid pools a bit on the surface, leaving the bottom of the container with dry icing.

If you do end up keeping your icing for a few days or more, I’d recommend putting it back in your mixer quickly before you use it, to try and ensure all ‘lumps’ are out.  You may also have to add icing sugar to help thicken it, or a little bit of water to thin it out.  Whether or not you’ll have to add icing sugar or water depends on a few factors:

Adding icing sugar – Especially if you’re in a humid environment the icing may have absorbed humidity in the air.  (Even if it’s in an air-tight container).

Adding water – Mixing the icing really well (especially with a mixer), tends to add volume/air, and thickens it up a bit.  It is necessary to mix it really well to get the lumps out though.


*

So how long can one keep royal icing in the (piping) bag?

The icing sugar (powdered sugar), and water in the icing begin to separate over time, so if you haven’t used your piping bags for a few hours, you’ll start to see this happen.  How fast it separates depends on how runny your icing is.  The runnier it is, the faster it will separate.  See pic below for example.


You can try and knead the bag a little bit to help the icing combine together again, but it won’t be as effective as taking the icing out of the bag and re-mixing it with a spoon or spatula etc.

If you use the icing that has been sitting in your piping bag for a period of time, you’ll end up with icing that comes out in little pools of water and icing sugar. (See pic below).


Where do you store royal icing?

Icing made with raw egg whites needs to be kept in the fridge, however, icing made with meringue powder can be kept at room temperature.  I store mine in air-tight or re-usable yoghurt containers. (Pic below; the dollop of icing on top makes it easy for me to see what color is inside).


To ensure against any crusting, place saran wrap (plastic wrap), on the surface of the icing as well.  If some of it has crusted over (if you’ve forgotten to put the lid on the container for example), scoop those bits out; they can’t be used.


How long do royal icing decorations last?

Once the royal icing has dried, the decorations last indefinitley!  (forever lol).  They don’t spoil but must be stored in a cool, dry place, in an air-tight container.  Besides humidity, the only thing to watch out for is breakage.  They are fragile and should be stored between parchment paper and bubble wrap inside the air-tight container.

Grease from buttercream, for example, can also affect royal icing over time, but it will take quite a while for the icing to absorb the grease.  After I posted these royal icing {LOVE} decorations (below), there were a few questions about grease affecting the royal icing in the comment section.


Since I’m going to be keeping these cupcakes in a display case at school to show students an example of what they will be learning how to make when the new semester begins in a few weeks, I’ll be able to keep tabs on the progress.

So far I’ve had the royal icing toppers in a cupcake for 2 days and there’s no dissolving, but the grease has seeped into the icing.  See pic below with today’s date on the phone. 


In this case you could only see the discoloration on the back as the front was covered in disco dust.

It’s definitely best not to place your royal icing decorations on your cake, cupcakes etc. too far in advance before you’re serving them.  The grease seeped into these royal icing between 24 – 48 hours of being put on the cupcakes.  Smaller royal icing decorations would probably be affected sooner, especially if the entire surface area is resting on the buttercream.


*

What does royal icing taste like?

Royal icing decorations are edible of course; it’s really just sugar and meringue powder.  It’s delicious if you like the taste of pure icing sugar (lol), but in my humble opinion, pairs nicely with cookies especially.  It dries fairly hard, but when you bite into it the sensation is kind of like a soft, crunchy texture.

*

For a brief visual how-to on making these Valentine cupcake toppers, see below.   A more detailed version on making royal icing decorations (also known as transfers, floodwork, runouts etc.), click here.

*

How to make these Valentine royal icing decorations:

1. Pipe base colors with royal icing.


2.  Add icing details once the first layer has dried.


3.  Sprinkle on disco dust if desired.


4.  Using a paintbrush (used only for decorating purposes), brush excess disco dust off.


For a more detailed ‘how-to’, click on the image below:


Making the cupcakes:

I’m grateful to Melissa of MyCakeSchool.com for some cool cupcake tips I learned and used after watching some of her videos (Re: paper towel tip – who knew!).  She’s got a ton of great advice on decorating.


My Cake School

I wish I had watched one of the videos before I made my royal icing hearts!  It mentioned making the tail of your hearts longer, so that when you stick it in the cupcake, you can still see the whole heart.


The cupcakes themselves were dipped in light pink sanding sugar and for those of you who are interested in cake stands, these milk glass ones were from ebay.


The vanilla buttecream and vanilla cupcake recipes can be found here.

*

These are just some of the main things I’ve learned about royal icing which have worked for me .  If you have any tips, questions or comments, please drop me a line below and come join me on facebook here.

*

Happy decorating!


Via: Sweetopia


UNYKA Etiquetas de : cupcakes, valentines, love, amor

Leer más...
Related Posts Plugin for WordPress, Blogger...

Rincones Unicos!

Aquí donde estoy...

UNYKA - View my favorites on Flickriver

Subscribe via RSS Feed Stumble-Up